
Behind the cabinet doors:
an Outdoors RV built for more freedom.
This Outdoors RV 280 KVS solar upgrade transformed an empty equipment space into an integrated solar, lithium, and Victron power system. Follow the installation from the first cabinet preparations to the finished build.
INSTALLATION STORY • OCTOBER 2026 • PRINEVILLE, OREGON
The goal
Planning the Outdoors RV 280 KVS solar upgrade

There is a lot of planning behind a finished RV electrical installation. Before the batteries are connected or a new solar panel goes on the roof, the equipment needs a home—and every part of the system needs to work together.
For this Outdoors RV 280 KVS, the project brought together added rooftop solar, a larger lithium battery bank, Victron inverter and charging equipment, and a central monitoring display. The goal was more flexibility away from hookups, with a clearer picture of what the electrical system is doing.
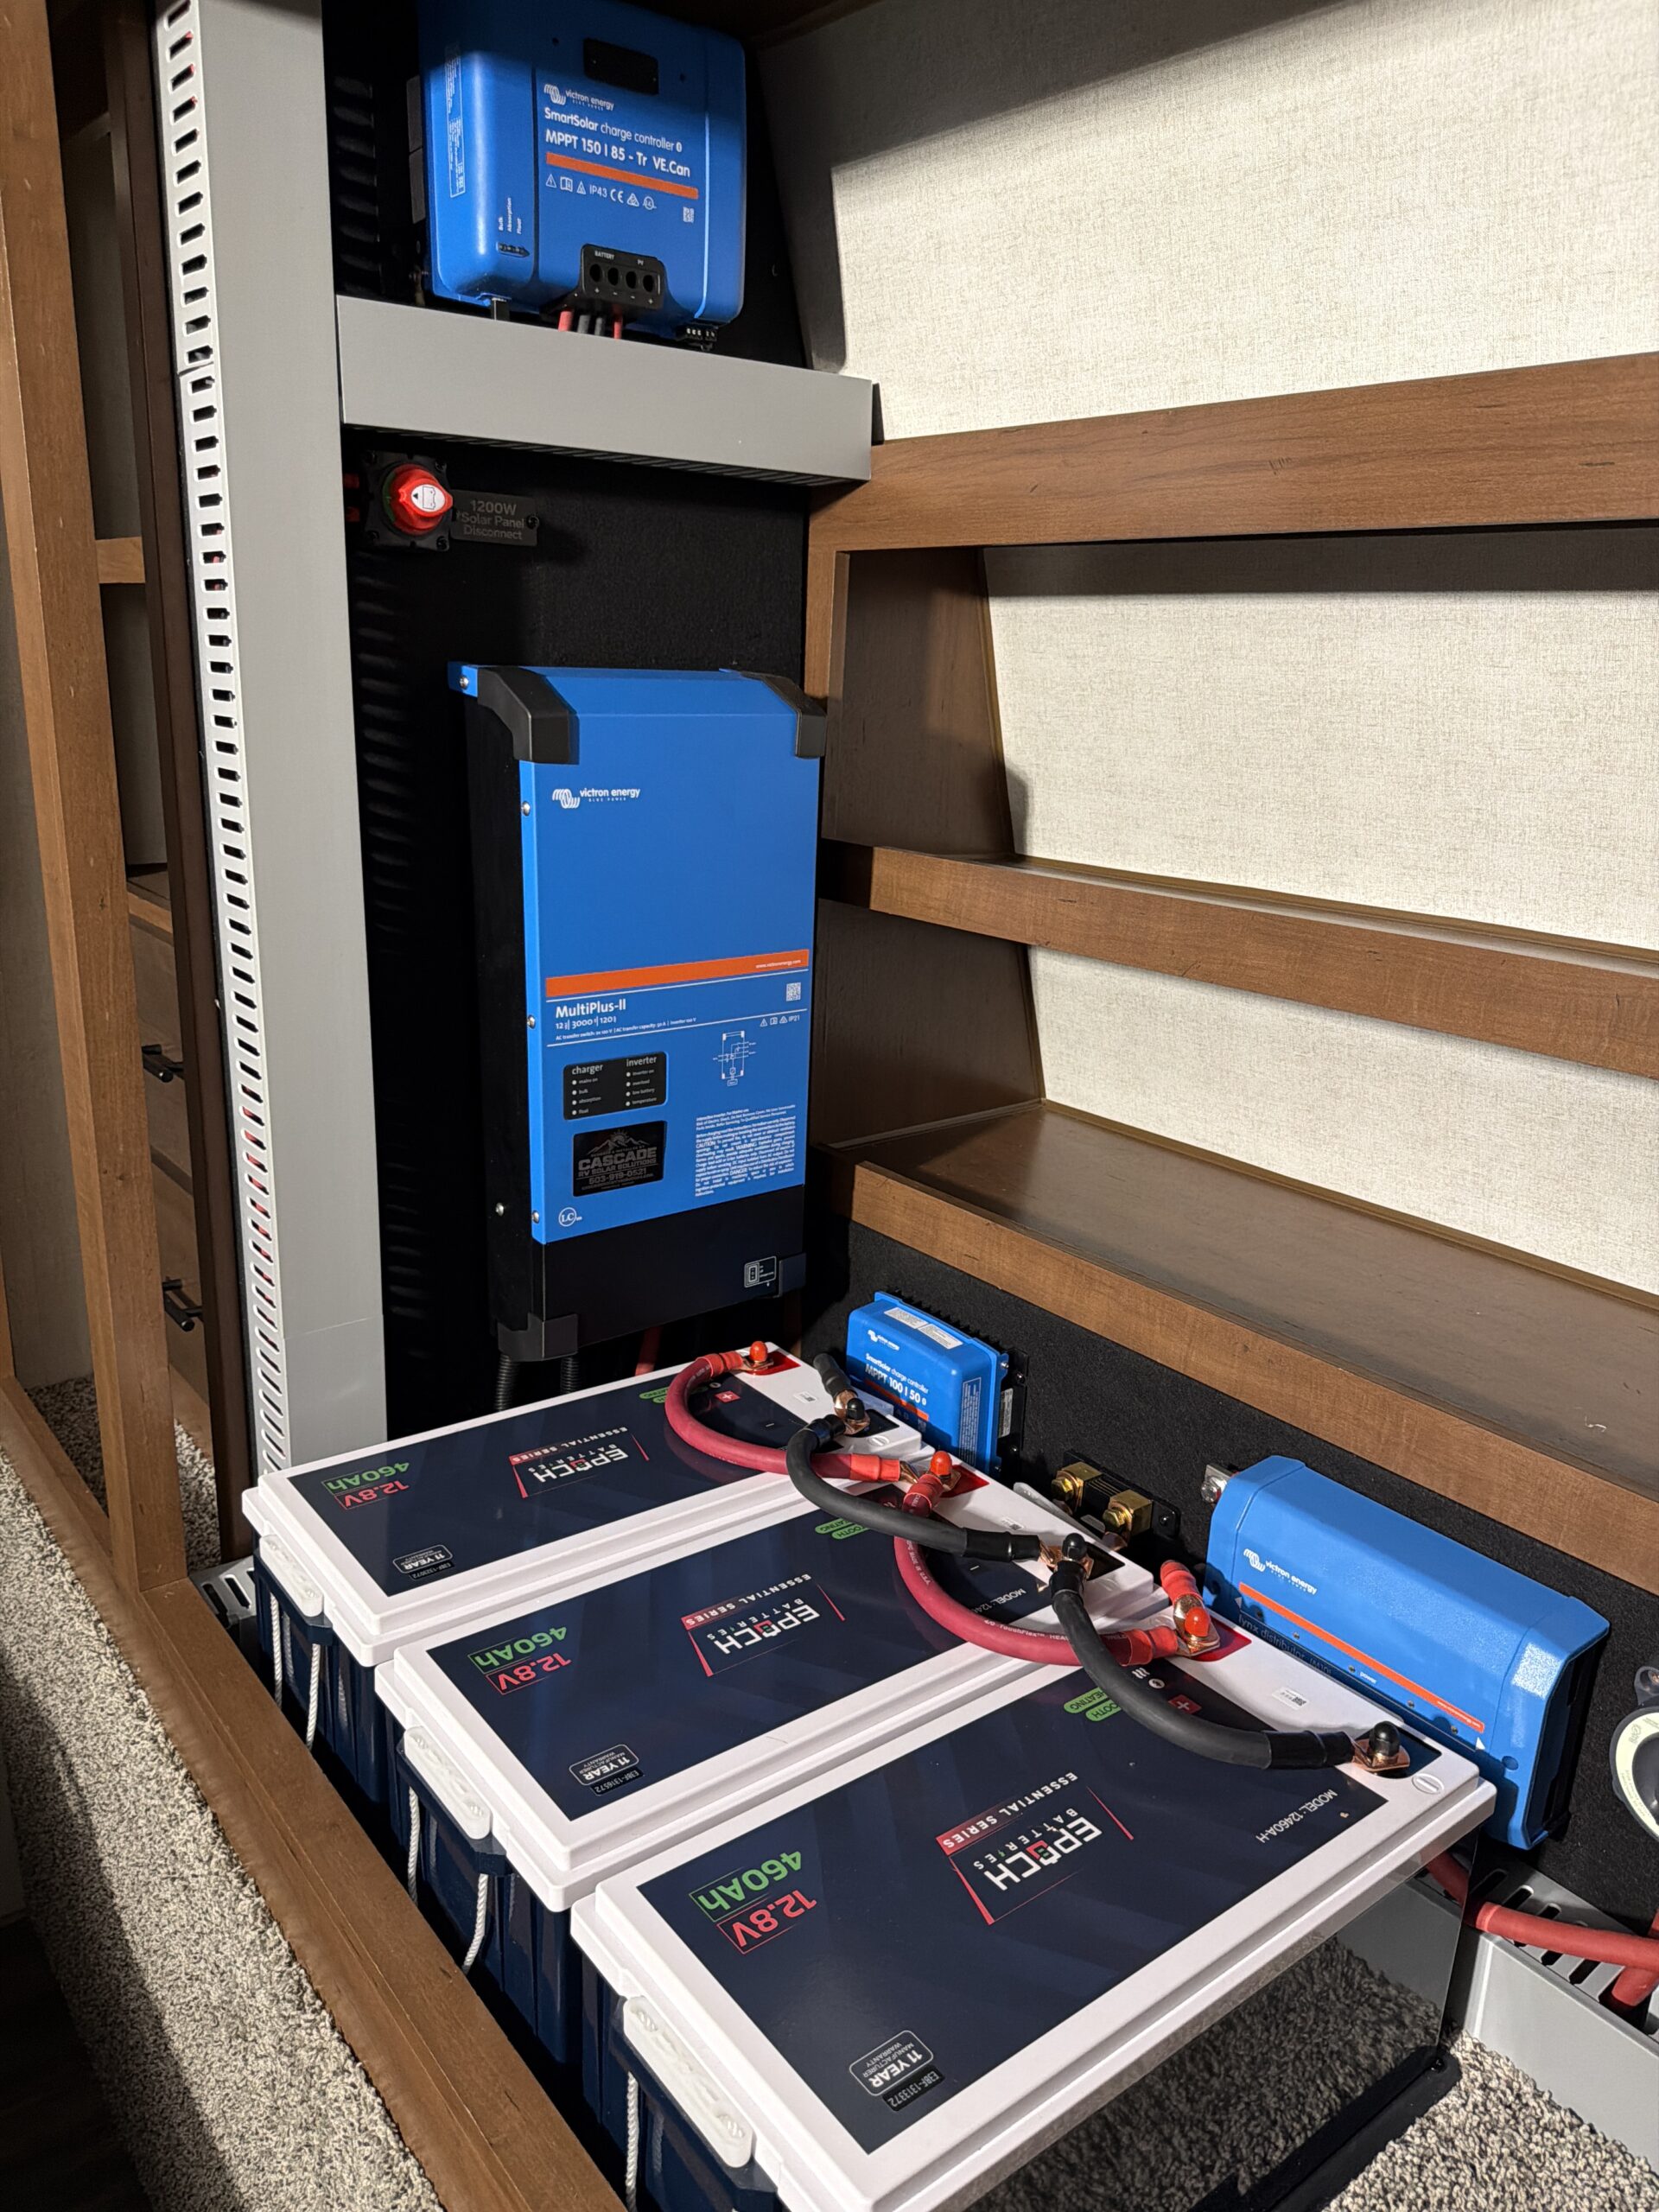
The finished installation tells that story at a glance: three Epoch batteries below, Victron equipment mounted around them, and identified disconnects close by. But getting to that point started with a much emptier space.
01 / Make room for the upgrade
The work starts inside the cabinets

Work began on October 12 with removal of the old converter and preparation of the installation area. The early photos show the cabinet openings before the new battery and power equipment went in.
This is an important part of an RV upgrade: finding room for the system inside a space that already has a job to do. Equipment placement, mounting surfaces, and cable routing all have to be considered together.
For this build, we prepared the lower cabinet area and enclosed the bottom drawer spaces for the equipment installation. That gave the project a defined area to build from as the charging equipment, battery bank, and wiring came together.
By the next stage, the empty cabinet was becoming a dedicated electrical space.
02 / Build the energy reserve
Three batteries at the heart of the system

The final build includes three Epoch Essential Series 460Ah lithium batteries. Together, they provide 1,380Ah of capacity in this 12V-class system—approximately 17.7kWh of nominal stored energy.
The original project description called for two batteries. An additional battery was included in the change order, bringing the finished installation to the three-battery bank shown here.
With the bank in place, the electrical space began to take its finished shape. The photos show the batteries side by side beneath the wall-mounted equipment, with the main cables routed into the surrounding installation.
That stored energy is what the RV draws on when solar production drops or the sun goes down. How long it lasts depends on the appliances being used and the way the owner camps.
03 / Bring charging and power together
RV solar charging and Victron inverter power

Six Rich Solar MEGA 200 ONYX panels add 1,200 watts of rated rooftop solar capacity to the project. Inside, the work included replacing the existing solar charge controller with a Victron SmartSolar 100/50, alongside the installed SmartSolar 150/85.
The Victron MultiPlus-II 12/3000/120-50 2x120V brings inverter power and battery charging into the same installation. It supplies connected AC loads from the battery bank and charges the batteries when suitable AC power is available.
The build also includes a Micro-Air EasyStart for air-conditioner startup support. As with any off-grid system, the appliances running at one time and the energy they use still shape how the system is operated.
Each component has its role: solar collects energy, the batteries store it, and the inverter makes that stored energy available to connected AC equipment.
04 / Make the system understandable
The finishing details matter

The equipment list is only part of the finished project. The owner also needs to understand what the system is doing and recognize the controls that belong to it.
A Cerbo GX MK2, GX Touch 70 touchscreen, and SmartShunt bring monitoring together. Battery information and power-flow readings give the owner a more useful view of the system than a basic voltage reading alone.
At the equipment, dedicated labels identify the main battery disconnect and the added solar array disconnect. Wiring channels help organize cable routes around the components.
These are small details to photograph, but meaningful ones to include. They help turn a collection of electrical components into a system that is easier to recognize and manage.
The finished build
One installation. A connected system.
Completed on October 17, this Outdoors RV 280 KVS solar upgrade brought solar collection, lithium storage, inverter power, charging, and monitoring together in the trailer. The transformation is visible in the photos—from the original cabinet area to the installed battery bank and Victron equipment.
That is the value of planning the whole installation. Each piece needs to fit the RV, work with the other components, and serve the way its owner wants to camp.
System note: battery capacity is nominal; available runtime varies with loads and conditions. The MultiPlus-II 12/3000 is a 3,000VA model rated for 2,400W continuous inverter output at 25°C.
Solar Powered
Sustainable Off-Grid RV Solar Solutions
Designing, installing, and optimizing custom RV solar solutions for efficient, green, off-grid experiences.


